The Rigid Frame Metal Building System

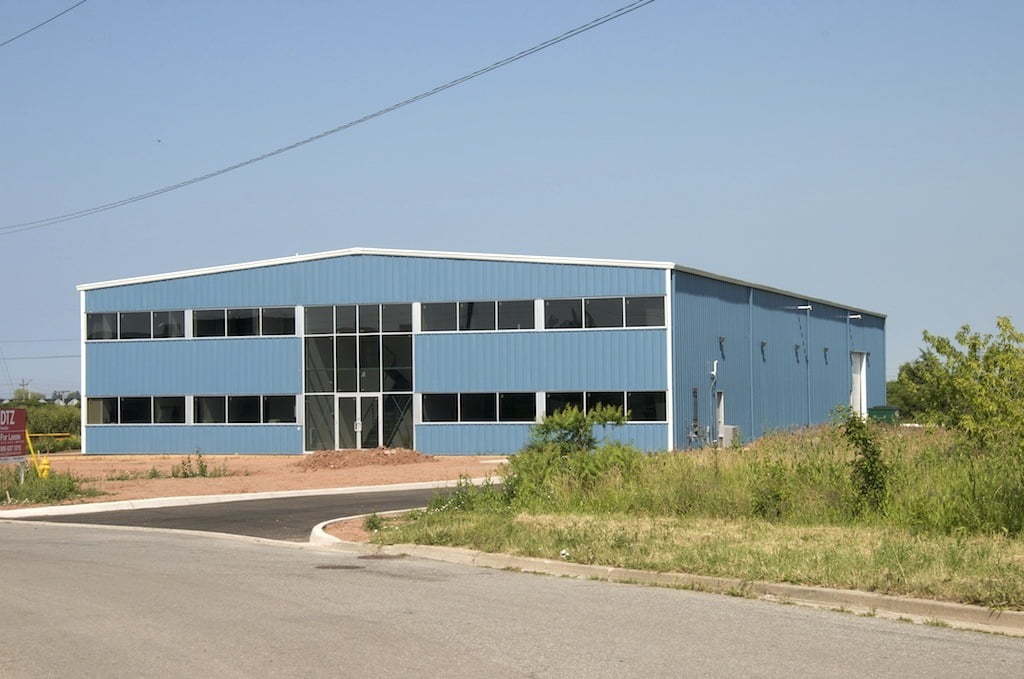
In a previous blog we discussed the different Metal Building Systems in the Norsteel Product line. We touched on the basic concepts and terminologies that are important for customers to understand, as they work with their Building Consultant to design the steel building that will ultimately meet all of their requirements.

As mentioned, Norsteel’s Rigid Frame Steel Building Systems, are by far our most versatile product line. Rigid Frame Metal Buildings can be customized to accommodate unlimited applications and project needs. 

Rigid Frame Metal Building

This is precisely because of the way they are engineered.

In this blog, we go over the structural support system of Rigid Frame Steel Building Systems.  A general understanding of the structural support components will help customers to gain an appreciation of how all the components work together to provide integrity and structural support for their steel buildings. This knowledge is what allows us at Norsteel, to provide our customers with innovative, cost-saving solutions. Because once you understand how the pieces go together to produce strength and support, you also know how to provide unique design solutions without sacrificing that integrity. This in turn, allows us to be creative in our approach to every steel structure.

Rigid Frame Metal Buildings

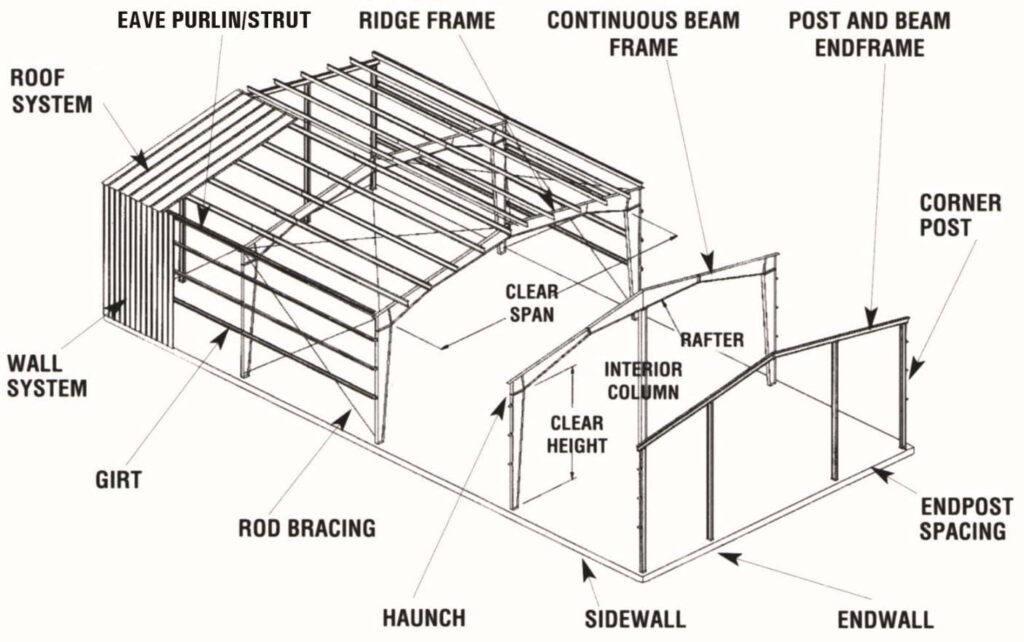
This diagram provides an inclusive look at the main components of a rigid frame metal building system. Not all steel structures are pre-engineered with all of these components. There are options and necessities which are dependent on the steel building application, the size and, the specific building codes and loadings for your particular building on your particular site. Several components must be added when there is, for example, a mezzanine or a crane in the building; or when there is snow shadow or significant point loads. But for the most part, this diagram is a good place to begin your introduction to the basic elements that make up a simple metal building system with a Rigid Frame.

Rigid Frame Metal Building Diagram

The Structural Support System

The Structural Support System of a Pre-engineered steel building is divided into 3 main parts:

  • The primary support system
  • The secondary support system and,
  • The bracing system

These 3 structural systems are engineered to absorb the loads and forces that are acting on the building and they transfer those loads into the foundation system.

1. The Primary Structural Support System

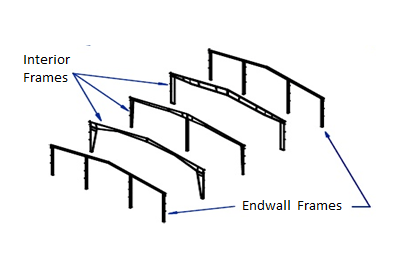
When we speak about the Primary Structural Support of a Pre-Engineered Steel Building, essentially, we are addressing the framing of the building.  The Primary structural support system is the main support of a pre-engineered steel building. For this reason, we often refer to the primary structural support systems as the main framing system of the building. It follows that when a frame is at an Endwall, it is called an Endwall Frame, and when a frame is within the building, it is called an Interior Frame.

Rigid Frame Metal Building Diagram

Rigid Frames and Endwall Frames are laid out in a carefully engineered pattern to provide the primary support for the building. The distances between the centerline of each of the frames is called a Bay.  Bay Spacing is an important factor in determining the design of your structure. The required width of each bay is something that customers should consider because it will have an effect on where you are able to place windows, service doors, and larger garage, overhead and bi-fold doors along the sidewalls of your steel building.

Rigid Frame Metal Building Diagram
Rigid Frame Support

The rigid frame is the most commonly used frame in pre-engineered Steel Building Systems, and so it stands to reason that it is responsible for why we identify this as a Rigid Frame Pre-Engineered Steel Building.  It is the Rigid Framing System on a pre-engineered steel building which offers the structural integrity to this construction. Without the Rigid Frame, there is no pre-engineered solution.

Generally speaking, a Rigid Frame is designed to bear the load for half the bay of the roof on either side of its location.

Although the majority of Rigid Frames are typically clear-span in design, the Rigid Frame is also available in a modular version.

Rigid Frame Metal Building Diagram
Rigid Frames are either Clear Span (no interior columns) or Modular (with columns). Modular frames have 1 or more interior columns between the exterior columns, that are responsible for supporting some of the vertical load that is carried by the frame.

Tip:  A Rigid Frame can be used in the interior framing as well as at an Endwall of a steel building
Clear Span Rigid Frames

By far the most frequently used primary framing in a Pre-Engineered Steel building is the Clear-Span Rigid Frame. We call these frames “Clear-Span” simply because they have no interior columns or support between the exterior columns. An amazing thing for all customers looking to achieve 100% usable interior space! In fact, it is the Clear-Span Rigid Frame that revolutionized construction and made metal buildings such an incredibly versatile and innovative investment.

Rigid Frame Metal Building

The typical Rigid Frame on a steel building has tapered vertical columns and a tapered rafter. These are the I Beams of the steel building – meaning that if you took a cross-section through either a column or rafter section, you would have an I-shape.

Typically, the rigid frame is thickest in the area where the column is connected to the rafter beam. We call this area, the Haunch.  The haunch is the thickest part of a Metal Building system simply because it is a load bearing spot in the building – it must support great force, and so, we must reinforce that area with steel.

Tip: Often, we have a customer who is trying desperately to achieve every square inch of usable space. In such cases, we employ a straight column rigid frame instead of our standard tapered column. This also comes in handy when we are trying to achieve a certain clearance under the haunch that we would otherwise not be able to accomplish. Rigid, Clear-span Frames with straight columns are usually less cost effective because they require the building be fortified in other (less ergonomic) areas.

Modular Rigid Frames

Often, a customer does not take issue with having a clear-span design. In such cases, we have the option of using a Modular Frame. Modular frames are simply Rigid Frames with intermediary columns, and the spacing between the intermediary columns does not have to be equal.   What is important here is the understanding that these extra columns provide strength and integrity to the rigid frame, redistributing the load of the force exerted on the haunch. And because the columns provide strength and integrity to the overall structure, Modular Frames can be used to bring the overall cost of a structure down. When used where they can be hidden within the architecture (e.g., in aisles or bleachers) the use of a Modular Frame does not impact the overall design of the interior of the steel structure.

The clever use of both types of framing is one way that your experienced Norsteel Building consultant will work with you to achieve the best solution for your specific building. Depending on the application for your steel building, we may incorporate both rigid frames as well as modular frames within the same design.

Rigid Frame Metal Building

Tip: The dimensions between interior columns are measured from the outside of the sidewall girt to the center-line of the first interior column. On all other interior columns, the column spacing dimension is measured from the center-line of one column to the center-line of the next column, until the last interior column is reached. The column spacing on the last interior columns is again measured from the center-line of the column to the outside of the sidewall girt.

Post & Beam Endwall Frames

The most common Endwall frames are called Post and Beam Endwalls. As the name implies, Post and Beam frames are comprised of Corner Posts, End Posts and Rake Beams. They are designed to support the load for half a bay of the roof and to support the addition of framed openings for windows, service doors and, garage or roll-up doors.

Rigid Frame Metal Building

In some cases, a Post and Beam Frame may be used as an Interior frame. We call this a Recessed Endwall. In such cases, a rigid frame is used to provide a huge overhang porch and the post and beam is used in the second bay as the entrance way. Many farm-house designs are laid out in this way in order to achieve the look of a large covered front veranda. Such designs are also used for drive-through windows of retail outlets, and for some car ports.

In still other cases, the Endwall Frame must be designed as a Rigid Frame, so that the structure is already prepared for future expansion and length may be easily added to the structure at a later time. In this case, we call it an Expandable Rigid Frame Endwall. In some cases, an Endwall may be designed as a rigid frame so that it can be capable of holding the weight of a large opening or hangar door.

Tip: Metal buildings are relatively easy to expand by lengthening, which involves disassembling bolted connections in the Endwall, removing the wall, and installing an additional clear-spanning frame in its place. The removed Endwall framing can often be reused in the new location. Matching roof and wall panels are then added to complete the expanded building envelope.

2. The Secondary Structural Support System

When we are speaking about the Secondary support system of a pre-engineered metal building system, we are referring to the Purlins and Girts. These structural members are the steel components that run horizontally across the roof and walls, spanning the primary framing.

Girts and Purlins are essentially the same with the only difference being their location on the building, and they have 2 main functions: To transfer the loads to the primary framing, and to provide a surface onto which the roof and wall panels are screwed.

The Purlins

We refer to the secondary system that provides structural support to the roof as the Purlins.

Purlins run horizontally between the frames of the roof. They are all-steel, z-shaped members.  The purlins on a rigid frame steel building are typically 8 and 10 inches deep, but are available in 12 and 14 inches when loading conditions require thicker reinforcement. The depth of the purlin as well as the spacing, is determined by the engineering itself and is dictated by both the design of the structure as well as its location.

The job of the purlins is to transfer roof loads to the primary structural support system, which in turn transfers the loads to the foundation.

Rigid Frame Metal Building
The Girts

We refer to the secondary system that provides structural support to the walls as the Girts.

Girts run horizontally between the frames of the walls and are attached to the columns.They are Z-shaped, similar to the purlins on the roof, and also come in C-shape which can be used around framed openings. The Girts take the loads imposed on the covering system and transfer them to the frames, which in turn, transfer them to the foundation.

The spacing of the Girts, varies with the load imposed on them. The depth of the Girts used in a structure is also determined by the particular loading requirements for that structure. Like purlins, girts are typically 8 or 10 inches in depth. Occasionally, 12 and 14 inch secondary members are necessary for specific applications and site locations.

Inset and Bypass Girts

Endwall Girts: The Girts on the Endwalls are Inset within the post and beam framing. This means that the girt is flush with the primary framing and does not take away any clear space from the interior of the structure.

Sidewall Girts: On the Sidewalls of the structure, standard practice is to provide bypass girts. All software design programs default to this type of girt. This means that the girt bypasses the frames and is attached on the outside of the primary frame line. In many cases, you have the option to recess, or inset the Girts within the framing. When customers are trying to maximize interior space, we use flush or inset girts as opposed to bypass girts.

Rigid Frame Metal Building

Tip: It is important to take the diminished clearance imposed by the structure itself into consideration, when determining the actual measurements of interior space.

One last thing to mention when we are discussing secondary structural members of a metal building rigid frame system, is that the Eave Strut is located at the intersection of the roof and the exterior wall. It acts as both the first Purlin and the last Girt. This is important because the building eave height is measured to the top of this steel member.

3. The Bracing System

The final structural support system of a Rigid Frame Steel Building is the Bracing system. As its name implies, the bracing system functions to resist the forces of the elements and to transfer these loads to the secondary and primary framing systems. There are several types of Bracing Systems that are used in Pre-engineered Steel Buildings. The most common are Rod Bracing; Portal Frames and Diaphragm Bracing.

Rod Bracing

Rod bracing or X-Bracing, is by far the most common type of bracing used to brace the building against forces from the elements, on a steel building system. The rod bracing in a steel structure is found in the roof between the rafters, and in the walls between the columns. Where the bracing goes and how much is needed depends on the design of the building and its location. A structure that is situated in a municipality with high wind load for example, will require more bracing than one in a different municipality with mild wind. Likewise, a structure designed with an open wall, will require more bracing than a structure that is completely closed.

Rigid Frame Metal Building

Tip: The location of Rod Bracing on a rigid frame steel structure is pre-engineered and cannot be moved on site without seriously affecting the integrity of the metal building system. When you work with your Building Consultant to arrive at a design that you are happy with, one important thing to discuss is the location of service doors and windows. Although both are field located (meaning that their precise and final locations can be determined on the job site), it is important to ensure that the bracing for the building will not interfere with the desired openings.

Portal Frames

Where it is not an option to use X-Bracing in a steel building, or when we require more strength in order to provide rigidity and structural stability to the metal building, a portal frame is used.  Essentially, a portal frame is a rigid frame that is pre-engineered to reinforce the steel structure. By lining the bay along the sidewall of the metal building, the portal frame reinforces the structure to resist strong longitudinal loads. Typically, if there is a portal frame on one side of the building, there is also a corresponding portal frame directly across from it, on the other side of the structure.

Rigid Frame Metal Building

Tip: Again, here it is important to take the diminished clearance imposed by the structure itself into consideration, when determining the actual measurements of interior space. The portal frame is as thick as a rigid frame and will add significant feet in all directions. Make certain to discuss the minimal clearance available in each bay with your Building Consultant so that you are clear what size door openings will fit in the space.

Diaphragm Bracing

Another type of bracing that is used to establish structural integrity in a pre-engineered steel building is Diaphragm Bracing. Diaphragm Bracing is inherent in most metal building systems, and results from the presence of the cladding – the exterior panels, that cover the primary and secondary framing of the steel building.  Cladding provides the building with aesthetically pleasing colour, and it obviously finishes the wall and roof skeleton of the building. In doing so, it provides yet another defensive bracing system against the loadings that impinge on the structure itself.

Rigid Frame Metal Building

Tip: There are several different options for Wall and Roof systems. Insulated Metal Panels; stucco finishes, faux wood and brick options – Wall cladding comes in several different configurations and several colours. The possibilities are numerous and will be discussed in more detail in future blogs.

Closing Out

In this blog, we went over the structural support system of the Rigid Frame Steel Building System. We discussed the primary and secondary structural systems and we discussed bracing. We discussed how these 3 structural systems are engineered to work together to absorb the loads and forces that are acting on the steel building and to transfer those loads into the foundation system.

An understanding of these structural components will help customers to gain an appreciation for the engineering behind their steel buildings, and how they are constructed. It will help them to plan for the design of their steel structures and for the location of functional access items like doors and windows.  Understanding the structural support systems of Rigid Frame Steel Buildings – how they are engineered to work together and why they are important in the design of their structures, is a great way for customers to begin a dialogue with their Building Consultant. It will also help customers to discuss construction when they are working with general contractors and erecting crews.

Here we have provided a general overview of the structural support system of a Metal Building System that uses a Rigid Frame design. In a future blog, we will discuss other components, things like door and window framing; gutters and downspouts; overhangs, insulation, and other accessories which can be added to all our Pre-engineered Steel building products.

Click the button below to download Norsteel’s rigid frame brochure.

Contact Us Today!

When you buy a building from Norsteel, we become your partner throughout the construction process. We work with you, or with your general contractor, to ensure that all your building requirements are met. Your project is our project, and we’ll be with you the whole way through.

For more information on specific building applications, click here to learn more about our line of products. If you have any questions or comments, click here to contact us today.

What is a Pre-Engineered Metal Building?

When we talk about pre-engineered steel buildings, what we’re talking about are structures which have been custom designed using software and then manufactured in a plant to be shipped to the customer as a completely pre-engineered kit. Everything is included and arrives at the job site on a flat-bed truck as a neatly wrapped package. The entire package – frame, roofing, components – is made from steel, one of the strongest and most durable materials on the planet.

Simply Put, Anything Goes…

The beauty of the pre-engineered steel building is that it can provide clear-span interior space, which can be used to satisfy virtually any customer requirement. Applications are endless. We will go through this more in detail later, but suffice it to say that our buildings are suitable for industrialcommercial, residential, agricultural and recreational uses.

As odd as it may sound, I’m more than a little passionate about the topic, so here’s a little history that I’ve picked-up over the years.

A History of Pre-Engineered Steel Buildings

The official-sounding term pre-engineered building came into use in the 1940s as a way to refer to all metal building systems that used a rigid frame design. These buildings were called “pre-engineered” because like their (distant) ancestors – the Quonset Hut – they relied on standard engineering designs for a limited number of standardized configurations.

Here is a quick overview of how steel building design and construction has evolved over the years: 

1940s: First, improvements in technology were constantly expanding the maximum clear-span capabilities of metal buildings. The first rigid-frame steel buildings introduced in the late 1940s could span only 40’ in width. Within a few years though, progressive widths of 50-, 60-, and then 70-ft buildings became possible; and by the late 1950s, rigid frames with 100-ft spans were made. That meant 100 feet of clear span width – no posts and no beams inside to obstruct the usable interior.

1950s: Along with the expansion of building size during the 1950s, this era also saw the introduction of a new manufacturing process which produced ribbed metal panels. Before this time, all metal buildings looked the same – they had the old, tired, corrugated panels like the Quonset Huts that looked industrial. The ribbed panel was flatter and more aesthetically pleasing.

history of pre-engineered steel buildings
In the early days, steel was strictly functional and lacked any aesthetic appeal.
colourful pre-engineered steel buildings
Advances in the 60s and 70s made it possible to create colourful, functional and aesthetically pleasing buildings like the one seen here.

1960s: What made these panels even more wonderful is that by the 1960’s, they were produced in colour. And at about the same time, continuous span cold-formed Z purlins were invented, the first factory-insulated panels were developed, and the first UL-approved metal roof appeared on the market.

But here’s the best part…during the 1960’s the first computer-designed metal buildings made their debut. Up until this time, all designs were done manually by engineers and design teams, so with the advent of computerization, as long as the purchaser could be restricted to standard designs, the buildings could be pre-engineered in limitless widths.

This marked the beginning of the metal Building BOOM….

1970s: As time passed and software became increasingly advanced, the original pre-engineered buildings were no longer restricted to standard designs. Metal building manufacturers could easily design and engineer buildings in different shapes and limitless sizes, with limitless openings for doors and windows. The number of potential applications exploded, as there were no longer required standardized size restrictions because each building was customized and designed taking into consideration each customers’ specific unique requirements and location.

Building Applications

Norsteel Buildings can be designed to suit unlimited applications. This is the most incredible thing about pre-engineered metal buildings – versatility. Our structures can be the solution for virtually every structural requirement.

Commercial pre-engineered steel buildings

Commercial Buildings

  • Mini-Storage Facilities
  • Restaurants
  • Car Dealerships
  • Convenience Stores
  • Car Washes
  • Mechanic Garage
  • Trades/Fabricator Shops
  • Retail Outlets
  • Office Space
  • Boat Storage
  • Aircraft Hangars
community facilities pre-engineered steel buildings

Community Facilities

  • Community Centre
  • Town Hall Meeting Facilities
  • Village Government Offices
  • Youth Centres
  • Tourist Information Centres
  • Cultural Centres
  • Health Centres
  • Search & Rescue Service Centres
  • Town Fire Halls
  • Pre-school/Day-care
  • Camp Bunkers
  • Elementary Schools
  • Churches
Agricultural pre-engineered steel buildings

Agricultural Buildings

  • Livestock Housing
  • Barns- Horse Barn; Dairy Farm
  • Dog Kennel
  • Produce (Tobacco, Grains) Storage
  • Tractor and Equipment Storage
  • Hydroponics Farming
  • Community Farmers’ Market
  • Fishery Service Centres
  • Marijuana Grow-op Facilities
Industrial pre-engineered steel buildings

Industrial Buildings

  • Warehousing
  • Manufacturing Plants
  • Truck Storage
  • Mining
  • Oil and Gas
  • Cement & Construction
  • Facilities
  • Forestry Equipment and
  • Logging Storage
  • Recycling/Garbage Storage
Garage pre-engineered steel buildings

Backyard Shops/Garages

  • Snowmobile Storage
  • Automobile Garage
  • Self- Storage
  • Mechanic Garage
  • Small Equipment Storage
  • Artist Studios
  • RV Storage
Recreational pre-engineered steel buildings

Recreational Facilities

  • Golf Course
  • Hockey Arenas
  • Sport Complexes
  • Bingo & Pool Halls
  • Swimming Pool Facilities
  • Riding Arenas

Benefits of Pre-Engineered Steel/Metal Buildings

A pre-engineered steel or metal building can save significant time, energy and money compared to a building that has to be designed and built from the ground up. This can help with affordability for those working with limited budgets, or those who are on a short timeline and concerned about the expenditure of such an undertaking. 

Indeed, a pre-engineered steel building can cut a lot of the headache, time and cost out of erecting a workspace or a large storage area for people, various bits of machinery or other needs. In fact, a pre-engineered metal building makes for a much easier build process that can be set up and assembled in just days instead of the weeks or months of a traditional building.

Here are some other benefits of pre-engineered steel/metal buildings.

Pre-Engineered Steel/Metal Buildings Are Cost-Effective

While a pre-engineered steel building may cost more upfront than simply buying the materials for a traditional wood structure, you’ll save far more money on the backend due to low labour and assembly costs. Not only are pre-engineered steel buildings incredibly tough and made to stand the test of time, but they’re also much easier and cost-effective to work with, which can really help you keep those labour costs down and shorten your project timelines.

Pre-Engineered Steel/Metal Buildings Are Flexible

Everyone knows that steel is rigid and strong. But did you know that a pre-engineered steel building provides an almost endless amount of design options and flexibility? Because pre-engineered metal buildings are designed to use the least amount of material possible to create a rigid and strong structure, you can always take a wall out, add an addition to the building, or whatever else strikes you. Or, if you need to swap out that small entrance with a huge, hangar-style door, you can do that too. Customize to your heart’s content or make changes down the line as your needs change – pre-engineered steel makes it all possible.

Pre-Engineered Steel/Metal Buildings Are Worry-Free

Unlike traditional buildings that need to be constantly checked on and maintained, especially after storms and other inclement weather, pre-engineered steel building designs are made to take much of the guesswork and worry out of it. Not only is steel great against high winds, dust storms, torrential downpours and snowstorms, but steel buildings are also highly resistant to bugs and insects such as termites and other pests because the steel provides no nourishment or place to hide.

A pre-engineered steel or metal building can save significant time, energy and money compared to a building that has to be designed and built from the ground up. That can make building a new building more affordable and financially viable for individuals and organizations that may be dealing with limited budgets and concerns with regard to the timeline and expenditure of such an undertaking. 

Indeed, a pre-engineered steel building can cut a lot of the headache, time and cost out of erecting a workspace or a large storage area for people, various bits of machinery or other needs. In fact, a pre-engineered metal building makes for a much easier build process that can be set up and assembled in just days instead of the weeks or months of a traditional building, not to mention the exorbitant costs. 

Here are some other benefits of pre-engineered steel/metal buildings.

Pre-Engineered Steel/Metal Buildings Are Cost-Effective

While a pre-engineered steel building may cost more up front than simply buying the materials for a traditional wood structure, you’ll save far more money on the backend due to low labor and assembly costs. Not only are pre-engineered steel buildings incredibly tough and made to stand the test of time, but they’re also much easier and cost-effective to work with, which can really help you keep those labor costs down and shorten the timeline between inception and a completed building.

Pre-Engineered Steel/Metal Buildings Are Maintenance-Free

As opposed to traditional buildings that quickly start falling apart as soon as they’re put into service — and sometimes even earlier! — a pre-engineered steel building is designed to provide years and decades of faithful service under the elements, no matter what Mother Nature tries to throw at it. That can make long-term maintenance costs for a pre-engineered metal building less of a concern than it would be for just about any other type of building, and it also means having a building that looks and functions great year after year.

Pre-Engineered Steel/Metal Buildings Are Flexible

Everyone knows that steel is rigid and strong. But did you know that a pre-engineered steel building provides an almost endless amount of design options and flexibility? Because pre-engineered metal buildings are designed to use the least amount of material possible to create a rigid and strong structure, you can always take a wall out and add on to the building to meet your growing needs. Or, if you need to swap out that small entrance with a huge, hangar-style door, you can do that, too. Customize to your heart’s content or make changes down the line as your needs change — pre-engineered steel makes it all possible.

Pre-Engineered Steel/Metal Buildings Are Worry-Free

Unlike traditional buildings that need to be constantly checked on and maintained, especially after storms and other inclement weather, pre-engineered steel building designs are made to take much of the guesswork and worry out of it. Not only is steel great against high winds, dust storms, torrential downpours and snowstorms, but they’re also impervious to bugs and insects such as termites and other pests because the steel provides no nourishment or even a place to hide. Furthermore, when it comes to the simple passing of time, a pre-engineered steel building is your best defense against the things that are all fighting to take your building down.

Learn More About Building Applications

The reliability of steel, coupled with the advances in technology over the years has led to a virtually limitless number of steel building applications, far more than what are listed here. Click here to learn more about potential building applications, and how steel is the perfect building material for your next project.

An Introduction to Building Foundations

In last month’s blog series, we examined the permit process and the early stages of a new construction project. We looked in detail at what documents and information are required to begin planning for a new steel building project, and how you should get a jump on this stage of the process during the winter months, so your project is ready to break ground during the warmer months. However, now that the worst days of winter are behind us – hopefully – we turn our attention to the next stage of the build process.

From now until the end of Spring, we will focus on the foundation system of metal buildings. We will discuss in detail, what foundations do and what types of foundations are suitable to support a steel building system. The first step is distinguishing where the steel building itself ends, and where the foundation begins.

What is a Foundation?

Simply put – the foundation is the lowest load-bearing part of a building, typically below ground.

Although foundations are not part of the typical metal building package that is shipped to your build-site, all our building systems are built on top of a foundation. For this reason alone, you should have a general understanding of what a foundation is and what role it plays in the overall structure of a building. It’s also important to understand how a foundation will impact the overall cost of your structure.

The foundation required in the erection of a Pre-Engineered building generally involves a concrete slab with concrete footings (see adjacent image). The footing is extra concrete, usually rectangular in shape, poured and formed under a column or some other structural support member of the building. A footing distributes the load carried by the building system support members into the supporting soil.

Connecting Structure to Foundation

When a customer orders a metal building system, the structure is carefully engineered taking into account the appropriate buildings codes and loads of their structure and their particular site location. Careful calculations are made which seek to measure the precise concentrated loads at each spot where a column meets the floor of the foundation.

It is at this connection point on each column that a metal base plate is required. This pre-punched metal plate is the connecting plate that joins the building to the foundation. The metal base plate is pre-punched to fit over the anchor bolts.

foundation
The diagram above details how a single column is connected to the foundation.
Foundation Base Plate
This is an example of a base plate; where a column is connected to the underlying foundation.

Who Designs the Foundation?

Just as your building will be designed and stamped by a structural engineer who is certified to practice in your specific province or state, so too will your foundation be designed and stamped by a foundation engineer who is specialized and certified for your specific area.

Once your building has been engineered, within the permit drawings package, you will be provided with precise locations for the positioning of anchor bolts within the foundation. You will also be provided with building reactions. These are specific to each structure and are important calculations on which your foundation must be based.

Foundation Drawing permit office
The anchor bolt layout drawing above shows exactly where each column will meet the ground.
Metal Base Plate
Each metal base plate connects to the foundation with anchor bolts – this drawing shows the required diameter.
Building Reactions
Calculation are made regarding the precise concentrated loads at each spot where a column meets the floor.

You will take the permit drawings for your building, to a foundation engineer who will design a foundation to meet the requirements of your specific structure and site location.

There are many different choices for your foundation. Together with your foundation engineer, you will determine which foundation suits your soil conditions, specific location and the application for your building.

How To Create a Metal Building Foundation

If you’re considering erecting a metal building, you’ll first need a foundation for the building to rest on. Not only is the foundation a crucial piece of how strong and rigid the metal building will be, but the foundation will also help protect the metal components from corrosion and other damage as a result of excess moisture or water. 

That said, while you can certainly try it yourself, it’s often best to hire a concrete contractor to do the work for you. After all, problems with a foundation can jeopardize the integrity of any building that sits on top, and that could be a real danger for the equipment or people inside. In addition to following industry standards and best practices, a contractor experienced in laying foundations will also help you avoid common pitfalls and give your new building the best chance of standing the test of time.

But before any work can start, you’ll need to secure a building permit first. A building permit is what allows you to create that metal building foundation, as well as erecting the building that sits on it. If you neglect this step, you could end up facing fines and other penalties, and you may even be required to tear down your building, or a significant part of it, after it’s all said and done. That’s because inspections and the permitting process can be extensive, and if you just barrel ahead and hope to figure it out later, it can mean significant backtracking, if not an eventual reboot of the entire project.

Once you’ve secured the building permit, the next step is to decide on metal building foundation details like where the building will go and the exact footprint of the building. To keep things simple, and especially if you’re using one of our pre-engineered steel building kits, you’ll want to stick to classic rectangular designs instead of going with something more complicated. Keep in mind that things like soil and drainage are important when it comes to the longevity and integrity of your metal building and its foundation, so make sure you get the opinion of a professional and exhaust all avenues and options before moving forward.

Now it’s time to prep the site for the foundation. Hire surveyors to stake the area and clear away any trees, shrubs or rocks. While you can certainly try to level the ground by hand, it’s often best to hire a professional. They’ll be able to advise you on the type of foundation your metal building needs, whether it’s a ground mount or concrete slab. For longevity, a concrete slab is best, though in instances of metal garages and other storage areas, you may be able to get away with a ground mount foundation.

Depending on the type of metal building foundation you opt for, specialized work will be required to create a foundation that will enhance your metal building’s strength, not detract from it. After the foundation cures, you’ll be able to start assembly up top. However, keep in mind that improper curing can reduce the strength of your foundation by up to 50 percent, jeopardizing the integrity of the building itself.

Get Started Today!

Foundations are a critical component of the full building package. When you engage Norsteel we become your partner throughout the entire construction process. Click here to contact us today for a free, no obligation quote on your next building project!

Occupancy Ratings: What You Need to Know

In a previous blog, we discussed how all steel buildings must be custom engineered taking into consideration the specific building codes and loads for their specific site location. We talked about the importance of understanding the specific Codes and Loads in the design of a metal building system.

Just as there are differences in structural design that correspond to different environmental conditions, there are also differences in design that relate directly to occupancy rating.

What Are Human Occupancy Ratings?

As the name implies, the occupancy rating is a designation given to a structure based on the number of human beings that the structure’s application would typically require or dictate. In general, the more people a building needs to protect, the stronger the building is required to be.

Buildings can fall into one of four occupancy rating categories:

  • Low Human Occupancy
  • Normal Human Occupancy
  • High/Substantial Human Occupancy
  • Post-Disaster/Essential

The majority of structures are designated as Normal Human Occupancy by the permit office. This is the catch-basin for all structures that do not fit into any of the other categories. Therefore, it is easier to distinguish what is NOT Normal Human Occupancy to understand what that category actually includes. With that said, let’s examine the different human occupancy rating categories and what each requires.

Low Human Occupancy

Buildings designated as Low Human Occupancy are strictly defined as those which have an occupant load of not more than one person per 431 square feet of floor area during normal use.

Examples of Low Human Occupancy buildings include agricultural structures, storage and equipment buildings. Each case is carefully evaluated before changing the occupancy rating.

low human occupancy buildings
Horse arenas and vehicle (boat) storage are examples of low human occupancy buildings.
  • Produce storage and packing facilities
  • Livestock and poultry housing
  • Equipment and machinery storage
  • Milking and dairy centres
  • Manure storage
  • Feed preparation facilities
  • Grain bins and silos
  • Farm workshops, farm rental centres
  • Horse arenas, riding, exercise and training facilities
  • Greenhouse and grow-op facilities

High Human Occupancy

Buildings designated as High Human Occupancy are those that are likely to be used as post-disaster shelters but whose primary use is characterized by a dense human attendance.

Examples of structures that are typically designated as High Human Occupancy include:

  • Elementary, middle or secondary schools
  • Universities and colleges
  • Auditoriums and stadiums
  • Places of worship; churches, mosques, etc.
  • Community centres
  • Manufacturing and storage facilities containing toxic, explosive, or other hazardous substances in sufficient quantities to be dangerous to the public if released
high human occupancy building
Restaurants, like the one built by Norsteel here, are examples of high human occupancy buildings.

Post-Disaster

The Post-Disaster designation is given to buildings which are essential to the provision of services in the event of a disaster. As you might expect, this designation carries with it the most intensive construction requirements.

post-disaster buildings
Fire stations and emergency vehicle storage like the one pictured here are examples of post-disaster buildings.

Examples of structures that are typically designated as Post-Disaster Buildings include:

  • Hospitals, emergency treatment facilities, and blood banks
  • Telephone exchanges
  • Power generating stations and electrical substations
  • Control centres for air, land, and marine transportation
  • Public water treatment and storage facilities, and pumping stations
  • Sewage treatment facilities
  • Buildings with critical national defense functions
  • Emergency response facilities
  • Fire, rescue, and police stations, and housing for vehicles, aircraft, or boats used for such purposes
  • Communications facilities, including radio and television stations

Occupancy Ratings and Norsteel

At Norsteel, we design according to your specific project’s needs and functionality requirements. So, if your building’s function requires a higher or lower human occupancy rating, this is an important discussion that you should have with your building consultant. Determining the proper occupancy rating for your building will have a direct influence on the integrity of your engineered structure and it has an impact on the cost.

In general, more people = more steel = more cost.

At Norsteel, unless you tell us otherwise, we will always default to designing your structure with a Normal Human Occupancy rating. Not all metal building providers default in this way. Some design using a Low Human Occupancy Ratings (category 1). This is important to consider when you are comparing your quotes. Remember that a change in a structure’s occupancy rating will change its strength as well as its cost. So be mindful.

In the end, it is the permit office that will determine the essential rating for your structure, so it is important for you to understand where your building sits on the scale. This way, you can make an informed decision on the rating of your structure from the very beginning of the design process.

Click here to contact us today for a free, no obligation quote on your next building project!

Understanding Building Codes and Loads

All buildings, including Metal Building Systems, must be engineered to meet certain building code and load requirements defined by the municipality or jurisdiction in which the building is located. At Norsteel, all of our buildings are custom-made to order so that our certified engineers can design a building that accommodates your design requirements while still adhering to your local building code and load requirements.

What Are Building Codes and Loads?

Buildings provide shelter for people and property. While a building should have many desirable characteristics, including an attractive appearance, long life, flexibility of use and economy, its basic requirement must be one of protection.

To break this down even further, we can consider two kinds of protection that buildings provide:

1. Protection against forces or loads that may be exerted upon the building

Unless the structure can offer adequate resistance against various loading conditions, the safety of people and the value of property are endangered. This is where sound design considerations must be given as to the strength of the building and particularly, to the structural system.

Building Codes and Loads

2. Protection against the elements – rain, wind, heat and cold:

Any of these can contribute to personal discomfort and cause a decrease in the value of contents and property. The degree of protection against the elements is determined by the weather tightness and thermal efficiency of a building. These factors greatly influence the design of a structure’s roof and walls.

Now that we understand the two broad types of load requirements, let’s examine each in detail so we can outline some of the specific loads that are taken into consideration when designing and constructing a new building.

Protection from Loads Exerted on the Building

Dead Load

The Dead Load is the total weight of the metal building system, including elements like the roof, framing, insulation, and covering members. The specific and detailed distribution of a structure’s weight must be taken into consideration when designing a building so that the structural integrity of the building itself isn’t compromised.

Live Load

The Live Load refers to any temporary load imposed on a building (that is not wind load, snow load, seismic load or dead load), that will be present during construction, maintenance, or present at different points throughout the life of the building. A few examples of a live load are workers, equipment and materials. The minimum Live Load per code is 20.89 PSF.

Collateral Load

The Collateral load refers to the weight of additional permanent materials, other than the weight of the metal building system, such as sprinklers, mechanical and electrical systems, and ceilings. Collateral loads in a building are evenly distributed suspended loads inside the building. A normal (minimum) collateral load is 2 PSF, which takes into consideration roof insulation and normal lighting. Sprinkler systems add 3 to 4 PSF, suspended ceilings add another 4 PSF.

At Norsteel we design all structures with a minimum collateral load of 3 PSF – Although lowering the collateral load will decrease the initial cost of a structure, the cost to reinforce the building once it has been manufactured and erected outweighs any initial savings. The collateral load should be clearly indicated on costing sheets.

Concentrated or Point Loads

Concentrated loads, occur either from roof top units or are loads that are suspended inside the building. Roof top units are typically things like air conditioners and make-up air units. Suspended loads can be from heaters, ductwork, cable trays or support strapping, basketball nets, mechanical piping, suspended walkways or conveyors, roof top units. All concentrated loads need to be considered in the building’s design. Although they are technically dynamic live loads (e.g., cranes and material handling systems), Auxiliary Loads also fall under this category and must be given careful consideration in the design of the structure.

Protection from the Elements

Wind Load

Structures must be designed to resist the forces imposed by the wind blowing from any direction. There are 3 specific concerns to be aware of regarding wind: Speed, Exposure and Enclosure.

1. Wind Speed

Wind speeds vary greatly depending on a building’s physical location and surrounding geographic area. As a result, these loads are imposed by the building codes for the building site within the designated municipality.

2. Wind Exposure

Wind exposure is determined by the specific location of the structure itself on the site, and what features are near the building.

  • Obstructions: Trees, buildings, terrain features
  • Exposure B: Obstructions within ½ mile zone
  • Exposure C: No obstructions on any side within ½ mile zone
Building Codes and Loads

3. Wind Enclosure

Wind enclosure speaks to the effect of wind as determined by the openings on the building itself.

  • Enclosed: All openings can be relied on to be closed during a storm
  • Partially Enclosed: One wall more open than the sum of the others; creates a ballooning effect
  • Open: Buildings with all walls at least 80% open; openings will remain open during storms

Snow Load

Technically speaking, the snow load refers to and addresses the vertical load induced by the weight of snow, assumed to act on the horizontal projection of the roof of the structure. This environmental load varies greatly depending on locality and site conditions. Note: Very wet snow 6” deep is equal to one inch of water. One inch of water on a square foot of surface weighs five pounds.

Seismic Load

The load or loads acting in any direction on a structural system due to the action of an earthquake.

Who Determines Building Codes and Loads

Building Codes and Loads are determined Nationally and Internationally, and imposed by our local municipal permit offices.  When we design a structure, we use the job site location and specifically the postal code to determine the National (or International) Building Code and Loadings for the specific municipality of the job in question. This takes care of mother nature’s influence. But remember that there are particular considerations that will be specific to your site location and where you want to place your building on the site.

When pricing out your steel building, ensure that your building provider is asking the questions that are important in ensuring the integrity of your building and the safety of everything you will be protecting.

Remember that pre-engineered buildings are custom designed and manufactured to your specific requirements. Each component is carefully engineered to ensure that it can withstand the elements for your specific circumstance. This is why there are no genuine clearance buildings and why customers should be very weary of buying a building that was designed for someone else. The design of your building relies on the information that you provide about its purpose, content and about the site itself. At Norsteel, regardless of a job’s location, we always demand a series of minimum requirements for our building projects to ensure a consistent level of quality construction.

Closing Out

The types of loads and their magnitudes are critically important to the design and construction of your steel building. At Norsteel we’ll work with you on your building project from start to finish to ensure the proper building codes and loads are used, without sacrificing on the design elements and functionality that you need from your steel building.  From commercial buildings, to agricultural, to even mining facilities, we do it all.

Click here to contact us today for a free quote on your next project!

Plan for Success: 5 Reasons to Start Your Building Project in the Winter

In Canada, we are fortunate to have such variety in our climate throughout the year and across the country – though, I might say otherwise if you asked me about our climate in January. For those involved in construction, this poses a real challenge. Most construction is done when the ground is soft, and the air is warm during the Spring and Summer months – and in Canada, we’re lucky if we get a full 6 months of conditions like these.

The Permit Process

One of the first steps in planning a new building is to make sure you understand your local zoning and municipal bylaws. You need to know what you can build, where you can build it, and what size it can be. All this information can easily be gathered through a quick visit to your municipal permit office.

In fact, in most municipalities if your structure is larger than a certain size you’ll have to receive permit approval for your building before you start construction, so it’s always a good idea to start your construction journey with a visit to your local permit office.

In the off-season, the permit process is usually far faster than during peak construction season. Assuming all your documents are in order and your building plan is up to code, permit approval can take as little as a week during the winter months. However, during the Spring or Summer months, it’s almost a certainty that your local permit office will be backed up with last-minute requests for review. If you submit your plans for review at this time of year, it’s very likely your request will be at the bottom of a backlogged pile of other permit requests – we’ve seen permit office backlogs delay building projects for months, and even up to a year!

Since permit offices are run by the city in which they are located, you’ll have to check with your local office on exactly what documents they require to approve your permit. However, there are a handful of documents you’ll almost certainly need to bring with you, and we’ll cover these in our next blog post.

5 Reasons to Start Your Construction Project During the Winter

Here are five reasons you should start planning for your building project in the winter:

1. Faster Permit Approval

Local permit offices become overloaded with requests during the spring and summer months. By waiting until the summer to file your permit request you could be delaying your construction project by anywhere from a few months to a full year! If you’re planning for a spring, summer, or even fall construction project, do yourself the favour of checking in with your local permit office as early as possible.

2. Faster Engineering Process

Permit drawings that are stamped by a Certified Engineer for your province will be requested from your permit office and required for approval. During the off-season, these drawings can be completed in as little as one week, but in the busier months these drawings can take up to five weeks because of backlog. It is also possible for the permit office to approve a project only after changes to the engineered drawings have been completed and brought back for review. If you’re revising your drawings, this could set you back another three weeks!

3. Faster Material Fabrication

In the summer months manufacturing plants become inundated with orders. It’s not uncommon for a building that would take 4-6 weeks to manufacture off-season, to take double the time to fabricate during the summer – just because of the backlog. By getting your engineered drawings completed and having your building permit approved as early as possible, your building will be first in-line for fabrication. Better yet, organize your time and schedule your delivery date months in advance so you can be totally prepared and in control of your construction schedule.

4. More, and Better, Contractor Options

Most contractors – and certainly the best ones – book their spring and summer construction projects months ahead of time. By waiting until the summer months roll around to begin your search for a contractor, you’ll be missing out on many of the great contractors out there who are already booked solid.  In addition, because their time is so valuable in the summer months, many contractors will charge more for jobs they agree to fit in to their already busy schedules.

5. Lower Prices

If none of the time-saving tips outlined here have convinced you, then maybe an appeal to your wallet will! During the winter months, building pricing is often far better than it is during the spring or summer months. Because the goal is to keep manufacturing plants busy year-round, customers can benefit from lower pricing and special offers on accessories. So, by starting your summer construction project in the winter, you’ll save on both time and money!

Final Note

Understanding the impact of seasonality on construction projects will help you plan around the weather and set yourself up for a successful project. At Norsteel, we are committed to working with you throughout the entire project, from design to fabrication, so you can be sure you are getting the best possible building for your needs. Contact us if you have any questions or want to get started on your next project today!

Steel Building Buyer’s Guide

Why Steel?

Whether you need a building for personal or business use, steel is the solution for you. Steel is one of the most commonly used materials in construction. Its versatility ensures its effectiveness in commercialindustrial, office, warehousegarage & workshop, airplane hangaragriculture, riding arena, and mini storage system settings. Combining pre-engineered components with steel construction will provide your building with four clear benefits:

  1. Cost Savings: When compared with conventional building systems, up to 40% in labour costs can be saved when putting up your pre-engineered building.
  2. Fast Construction: Pre-fabrication of steel components means your construction can be done in minimal time – it takes only weeks for simple projects and even large complex jobs can be assembled in 60 to 90 days – compared to 6 months or more for traditional methods.
  3. Remarkable Resilience: The durability of steel helps buildings last 20 to 30 years without requiring painting or other maintenance, outlasting other materials.
  4. Environmental Sustainability: Pre-engineered steel buildings use galvanized steel sheets that are made with 25 to 30% post-consumer recycled content. All steel is 100% recyclable.
Steel Smelting Norsteel Buildings

While construction takes a short time with pre-engineered steel buildings, it is always important to consider the full project timeline – from planning to finished product. An accurate plan translates to a well-executed project from inception to occupation. Below are the four main steps involved in the production of any building, along with the timelines for the average pre-engineered steel building. This information will help you know what to expect when you approach a steel manufacturer with a project for your new building.

Step 1: Specify the Design

Before any work can start on the project, everyone involved needs to know what it is expected to look like. An initial meeting will be held with your building consultant where you will describe the function that you want your building to serve. If your project is a complicated one, you may need an architect to be involved as part of your design team. Working together, general information about the building will be identified, but before your first discussion, try to consider the following things:

  • Size;
  • Shape;
  • Type of interior walls and roof;
  • Number and placement of windows and doors;
  • Any façade or cosmetic enhancement needed.

To help this process go smoothly, it is good to have an idea of each of these characteristics for your building prior to the meeting. It’s also important to discuss the functionality of your structure – what you are using it for and all the requirements it needs to fill.  Most companies should have brochures available for you to browse and get familiar with their capabilities.

Based on your criteria, your Building Consultant will work with you to produce preliminary designs for your building. You may go back and forth a few times before you are completely satisfied with the final preliminary design. The engineering of your structure will be based on these, so make sure you are completely happy with them before moving forward.

Timeline: Simple projects can take only hours to design. Complex multi-faceted facilities can take months. How prepared you are for this first step in the building process, dictates how long it will take. It’s one way to cut down on the overall timeline of your project.

Step 2: Engineering

Once you have your preliminary design and have made an initial deposit, the engineers can get to work creating the specifications and blueprints for your building. Every pre-engineered building is individually customized for its specific use and geographical location. This is a very important fact.  It means that your specific geography must be taken into consideration in order to secure the integrity of your specific building. The National Building Codes are used in this engineering process. You will receive these structural drawings to take to your permit office. These should be signed, dated and stamped by a licensed engineer from your province or state.

You will also give these drawings to your foundation engineer who will use the anchor bolt locations and the reactions from your structural drawings, to design the proper foundation for your requirements and soil conditions.  Like the pre-engineered structural drawings, your foundation engineer will produce certified drawings for you to bring to your local permit office for approval.

Timeline: For simple projects, engineering can take from 6-10 days; for complex projects, engineering can take 2-5 weeks (engineering part), the same may be true for your foundation drawings.

Step 3: Permit Processing

Acquiring the relevant building permits that you will need before beginning construction is the next step. How long it takes will depend on your particular municipality, your site location, and on the complexity of your project, as well as on the time of year that you apply for permit approval.

It is always advisable to take advantage of the lull in construction during the winter months when the permit offices are not overburdened by spring and summer projects. This is one way to cut the timeline – time your permit submission so they can be approved quickly, or any issues can be resolved while the frost is still in the ground. This way you can be ready to break ground as soon as the weather allows.

And remember, any changes that are required at this stage will lengthen the project timeline and can result in surcharges and high re-engineering costs.

Timeline: 3 weeks to 1.5 years for county/city permit processing.

Step 4: Fabrication and Delivery

Once your permits have been approved, your project can then be released to production and at this time, you will likely be asked to provide a second deposit. The detailing team will begin by producing the essential component inventory for your specific building and manufacturing will begin.

In the case of pre-engineered buildings, all these parts are produced and pre-cut to the exact dimensions that you need in a separate facility. They are even pre-drilled so they will be ready to be assembled and bolted together once they arrive at your construction site. This considerably reduces the construction timeline compared to buildings that are not pre-engineered, letting you enjoy your finished building much sooner.

Timeline: 3 – 12 weeks depending on complexity.

Steel Framing Norsteel Buildings

Final Thoughts

This 4-step process is the typical sequence of events for most of the customers we work with. And while the timelines we have listed in this blog are averages, it is important to remember that all timelines will vary from manufacturer to manufacturer. At Norsteel, for typical projects, we get all the work done within 6-8 weeks. Many of our customers have already received approval from their permit offices and in such cases, we can move very quickly from inception of design to delivery. These projects can take as little as 4-6 weeks to arrive at your site, from the time that you have your initial discussion with your consultant.

The ultimate goal is a smoothly executed timeline so that while we are busy manufacturing, you are preparing your site, pouring your foundation, and getting ready to receive your building.

One last piece of advice – before you start planning your new building, take the time to contact your local permit office so you are aware of any restrictions for your building and specific municipality. It’s also a good time to ask them to send you the current building codes and loads for your area.